· productivity · 7 min read
Automate Your Workflow: The Ultimate Guide to Airtable Automation
A practical, step-by-step guide to building reliable Airtable automations-covering triggers, actions, scripts, webhooks, SaaS integrations, best practices, and debugging tips so you can eliminate repetitive work and scale your processes.

Outcome: by the end of this guide you’ll be able to design, build, and maintain Airtable automations that remove repetitive tasks, connect to other SaaS tools, and scale with your team. Read on for clear examples, code snippets, and practical best practices you can apply today.
Why automate Airtable?
Manual updates, missed notifications, duplicate data entry-these are productivity killers. Airtable automations let you eliminate that busywork and convert predictable workflows into reliable, repeatable systems. Save time. Reduce human error. Free your team to do higher-value work.
Airtable is powerful on its own. With automation, it becomes a workflow engine.
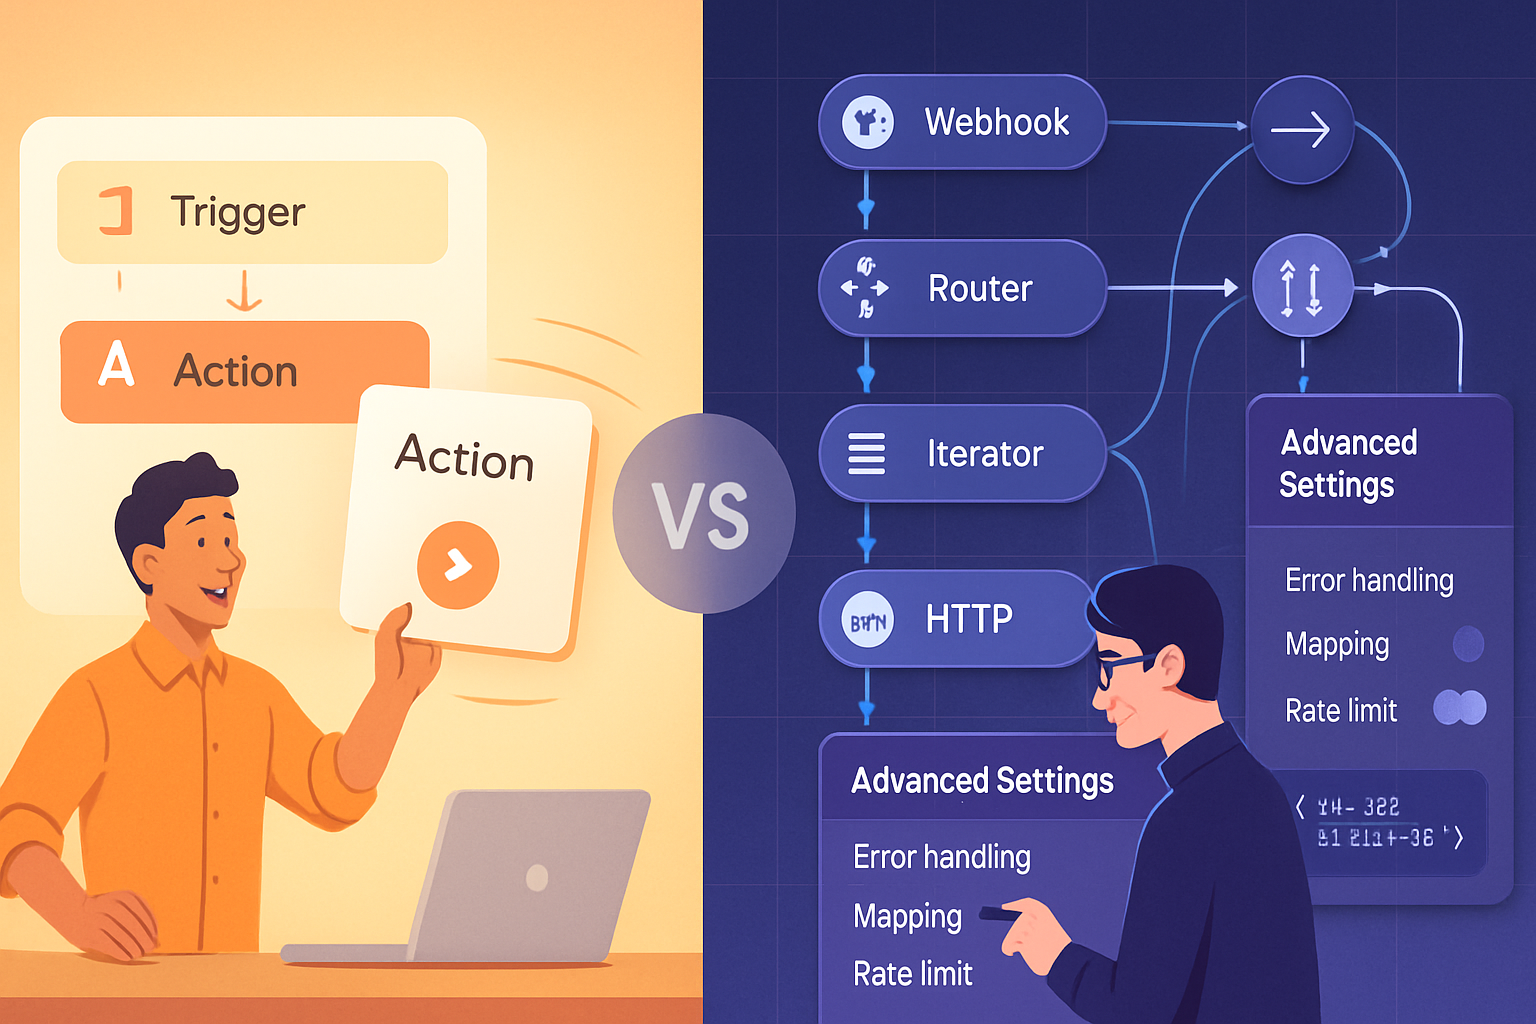
The building blocks: triggers, actions, conditions, scripts
- Triggers - What starts the automation. Examples: “When record matches conditions”, “When record created”, “When webhook received”.
- Actions - What happens after the trigger. Examples: “Send an email”, “Send Slack message”, “Update record”, “Run a script”.
- Conditions (If/Else) - Branch logic that lets you run different actions depending on record values.
- Scripting - Use JavaScript to implement complex logic, call external APIs, or perform bulk updates.
Airtable’s official automations overview is a good reference: https://support.airtable.com/hc/en-us/articles/360056776753-Automations-overview
Quickstart: build a simple, high-impact automation (5 minutes)
Goal: When a task’s Status changes to “Ready for Review”, notify the #product-review Slack channel and add a comment in the record.
Steps:
- Open Automations → Create new automation.
- Add trigger - “When record matches conditions”. Table: Tasks. Condition: Status = “Ready for Review”.
- Add action - “Send Slack message”. Connect your Slack workspace, choose channel
- Add action - “Update record”. Use the record ID from the trigger to add a comment or set
- Test each step using the built-in test button; then toggle the automation on.
Why this works: small, focused automations have the highest ROI and are easy to maintain.
Common Airtable automation recipes
- Auto-assign tasks - When a new task is created, find the team member with least open tasks (via a formula or script) and set Assignee.
- Form → Task creation - When a form response arrives, create tasks, add dependencies, and notify stakeholders.
- Status change → deliverables - When deliverable is approved, create a release checklist and ping the release channel.
- Sync rows from Google Sheets - Use Zapier/Make to push new rows into Airtable or use Airtable’s webhook + script for advanced sync.
For Zapier and Make integrations see:
- Zapier: https://zapier.com/apps/airtable/integrations
- Make (formerly Integromat): https://www.make.com/en/integrations/airtable
Advanced technique: Webhooks and external APIs
When you need to start an automation from an external service (or push Airtable data to another system), use webhooks.
- Trigger - “When webhook received”. Airtable will give you a unique URL to receive POST requests.
- In the automation, add actions to parse the webhook payload and update records or run a script.
Example flow: A payment system sends a POST to Airtable webhook → Airtable finds the customer record → updates subscription status → runs a script that posts a summary to Slack.
Airtable webhook doc: https://support.airtable.com/hc/en-us/articles/360050981813-Triggering-automations-with-a-webhook
Advanced technique: Using the “Run a script” action
Script actions unlock complex logic. Scripts run server-side in Airtable’s automation environment and give you access to the base, input.config(), and output helpers.
Example: find overdue tasks and update a “Priority” field.
// Example Airtable automation script
let config = input.config(); // map input variables from your automation
let table = base.getTable('Tasks');
let query = await table.selectRecordsAsync({ fields: ['Status', 'Due date'] });
let updates = [];
for (let record of query.records) {
  let status = record.getCellValue('Status');
  let due = record.getCellValue('Due date');
  if (status !== 'Done' && due && new Date(due) < new Date()) {
    updates.push({ id: record.id, fields: { Priority: 'High' } });
  }
}
if (updates.length) {
  // update records in batches - each call can update many records
  while (updates.length) {
    await table.updateRecordsAsync(updates.slice(0, 50));
    updates = updates.slice(50);
  }
}
output.set('updatedCount', 'Updated ' + updates.length + ' records');
Scripting docs: https://www.airtable.com/developers/scripts
Notes:
- Use input variables instead of hardcoding values.
- Batch updates where possible to avoid long loops.
- Use try/catch for predictable error messages.
Integration patterns (Slack, Gmail, Google Sheets, Notion, etc.)
- Direct actions (Send Slack, Send Email) are the simplest route when available.
- When you need richer features or cross-account access, use an integration platform (Zapier or Make) or call APIs from a script/webhook.
- For two-way syncs, prefer middleware (Make, Zapier) that can handle de-duping and throttling.
When you need granular control over the data model or cross-base syncing, build a small middleware service that uses the Airtable REST API: https://airtable.com/api
Best practices for maintainable automations
- Name and document everything
- Prefix automation names with team/project:
PM - Notify Review. - Add a short description in the automation settings explaining what it does and why.
- Prefix automation names with team/project:
- Keep automations single-purpose
- One trigger leading to one logical purpose is easier to test and debug.
- Use versioning in names when making big changes
PM - Notify Review (v2)while testing v2.
- Use environment/config inputs
- Pass record IDs, constants, and API keys as input variables or via secure connection settings rather than hard-coding them in scripts.
- Test thoroughly
- Use the automation tester with representative records. Use a staging base for risky automations.
- Monitor run history
- Check the Automation runs and run history regularly for failures and unexpected spikes.
Debugging and observability
- Use descriptive error messages in scripts and output them. The
output.set()function is helpful in scripts. - Use small, incremental tests rather than end-to-end tests for faster iteration.
- When an automation fails, check the run logs - Airtable shows which action failed and why.
- Track run counts and failures in a dedicated table if you need long-term analytics.
Security, permissions, and governance
- Automations run using the account that connected the action (or the automation’s connection). Ensure that account has the correct scope and not overly broad permissions.
- For external APIs, store credentials securely (use your automation’s authorized connection or an external secrets store if using middleware).
- Use per-team or per-project integration accounts rather than personal accounts to avoid service disruption when a person leaves.
Limitations and cost considerations
- Automations have run limits and execution quotas that depend on your Airtable plan. Monitor your usage and upgrade if needed.
- Some integrations and actions require OAuth connections and may be subject to API rate limits in the external service.
- For heavy-volume or low-latency integrations, evaluate middleware or a lightweight backend service to avoid hitting Airtable automation limits.
Check Airtable’s pricing and limits for details: https://support.airtable.com/hc/en-us/articles/360056052193-Airtable-pricing-plans
Example end-to-end automation: form → Slack → Google Sheet (via Zapier)
When you want to collect submissions in Airtable and ensure stakeholders and analytics systems are updated, combine direct automations and middleware:
- Airtable form submits to your base.
- Automation (trigger - record created) runs:
- Action 1 - Send Slack message to notify team.
- Action 2 - Run webhook to Zapier (or Make) that appends the same row to Google Sheets and triggers deeper analytics pipelines.
Why this pattern? Slack notifications and quick updates stay in Airtable, while Zapier/Make handle third-party systems and retries.
Practical checklist before turning an automation on
- Does the automation have a clear, single purpose?
- Are inputs parameterized (no hard-coded IDs or secrets)?
- Have you tested all branches (If/Else)?
- Did you test with representative data and edge cases?
- Are alerts set up for failures or run spikes?
- Is the automation name and description clear?
- Are run quotas and costs acceptable?
Final thoughts - prioritize impact, then scale
Start with automations that remove repetitive, high-frequency tasks. Small wins build trust and free up time. Once you have a few reliable automations, introduce scripts and webhooks to solve the edge cases and integrate systems. The strongest automation is the one that consistently reduces friction across your team’s workflow.
References
- Airtable Automations overview: https://support.airtable.com/hc/en-us/articles/360056776753-Automations-overview
- Triggering automations with a webhook: https://support.airtable.com/hc/en-us/articles/360050981813-Triggering-automations-with-a-webhook
- Airtable Scripting: https://www.airtable.com/developers/scripts
- Airtable API (general): https://airtable.com/api
- Zapier + Airtable integrations: https://zapier.com/apps/airtable/integrations
- Make + Airtable integrations: https://www.make.com/en/integrations/airtable
Actionable next step: pick one repetitive task you (or your team) do daily, and build a focused automation for it this week. Start small, test, then expand.